Welcome to my final review of the early 2018 Lego Speed Champions individual sets. Last and by no means least, we have the Porsche 919 hybrid. This is actually the second time it’s been featured, and was originally in the Porsche 919 Hybrid and 917K Pit Lane 75887 set that was released in 2016.
I went into this review with conflicted feelings. The last set I review was the Ford Mustang which was an exceptional set. Before that the Fiesta and Ferrari 488 GT3 were my first forays into Speed Champions land. Every one has been better than I expected or ever hoped so this has a lot to live up to, not least because it’s a slightly awkward looking car in the first place imo. So, I’m pleased to say that the Porsche 919 Hybrid has not disappointed me! So read on.Starting with the front of the box, it’s the standard LEGO Speed Champions branding with that racing grey look. In the top right is the Porsche Logo. And below that, the car is well and truly the star. In common with the Ferrari, the car is not in an action pose, but instead is in the pit lane. This time being worked on by the driver. I’m wondering if the pit lane pose is deliberate for the track cars or just coincidence. Let me know your thoughts in the comments.

Moving to the back, and the car well and truly get motoring. Featuring one shot of it zooming around a track looking quite at home. The second shot in the lower left I think is meant to show it in motion but I think the photographer may have set the traffic light up wrongly. That, or the car is out of control. I the top right, the driver is again working on the car – I’m wondering how much driving he actually gets to do based on the box art.
Finally, as per the norm, an action shot adorns the lower right. And what a magnificent looking Beast the Porsche 919 Hybrid is in reality! Before you’ve even opened the box, you can see that the LEGO Designers have done a great job of capturing the car’s most prominent features.

Inside the box, it’s well packed with 3 bags of bricks, 2 bags of hub caps and one chassis piece – different to the others I have. The manual is again folded – I wish they’d make them slightly smaller, but guessing it’s a standard production run size for them. And the most perfect sticker sheet to date! This makes me happy. What I wasn’t so happy about were the number of 1×1 stickers included. But more on that later.

Looking at those parts, as expected, there’s a lot of red, white and black. And as usual a lot of filler pieces in other colours that are used throughout the structural parts of the model.
Putting the Bricks together
First off, I like to do a short time-lapse of the build which you can check out on my YouTube channel.

So, the build was fairly formulaic in terms of how the car went together with the base, angle plates for the sides and a few other things.
The fin that runs along the back of the car was attached using 1×2 single studs running along the back of the car. And that is finished off using a technic piece to create the air vent effect.
But, there was one feature I loved in the build which is shown below. In the original car, there’s quite a prominent air vent setup. The designers have achieved something similar using a 2×2 plate with a clip behind onto a ‘coat hanger’ piece (best guess name). But, they then used a 2 x 1.5 piece with a groove in it. The 2×2 piece then slides perfectly into it and really made that piece solid where it risked being flimsy.

Otherwise, the designers have used sensible pieces all around to get as much of the shape into the car as possible.
One thing that I did struggle with a little bit was the stickers this time. Mostly because there were several 1×1 stickers. I think most of them were for the Michelin Man. So thank you for that Michelin Man. The other tricky one – but I nailed it – was the one on the windscreen because it has a big 1×2 gap in it which makes lining it up fiddly and also prone to creasing if you aren’t careful.
But, the stickers were on the whole pretty easy to apply and really add to the finished set. If they weren’t there I think the set would look very odd – must try that one day.
The Finished Porsche 919 Hybrid Model
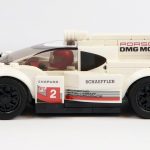
With all the bricks together, the final car is once again exceptional. I’ve somehow managed to save the best for last with this Porsche and the Mustang. The lines of the car flow and despite the shape limitations of LEGO at this scale, the car does have a very “racey” feel to it thanks to the angles and reasonably low height. Again, much like the Ferrari before it, helped by that windscreen. The side build of the lights is a nice and different feature that compliments the car development. The laptop piece didn’t want to cooperate when I was taking these photos so I’ve made do with is being on the stand.

Comparing it to the previous model, personally I think that the newer shape is much, much better and flows front to back. This is an image of the 2016 version of just that car from the 75876 set as found on the Brickset website so be sure to go and give them some love. To me it looks a bit awkward at the front – the back and sides are pretty good, though that new side panel I mentioned earlier really benefit the new model on the whole.

From the side, beyond what I’ve previously mentioned, it’s all lines and curves to that huge back spine and wing. The stickers for the various sponsors are excellent and give the car a nice finish. That side panel has a lot of character thanks to the choice of bricks, and captures that side groove from the real car so well.

From the front, what can I say? Awesome! The curves and colours just draw you into that huge wing at the back effortlessly, starting with that ground scraping wing at the front. The stickers, despite being on different levels of the build, all sit well and compliment each other. And that technic air vent on the roof does a good job of showing what it’s meant to be. I’m not 100% convinced on the part choice, but I don’t have a better option currently, so it’s the right one. The driver is peaking out looking very happy to be at the wheel of this cool car!

The back is quite plain on this one, but there’s enough going on throughout the car to make that not matter. And the use of the upturned ‘bookshelf’ pieces captures the essence of the rear splitter these race cars have.

From the top of the model, you get a good view of all the channels going on in this car. Starting at the bonnet with the two lower set sloped black pieces. Scooting round that long windscreen and into those two angled channels. Before wrapping behind the driver and either side of that central fin. Splendid!

The driver doesn’t have a massive amount of space in this one, but does sit behind the only printed piece which is the dashboard. Note the two reversed door pieces on either side of him.

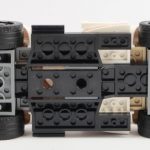
For completeness, here’s the underside. Not a log of note other than it’s the different base plate and that ground hugging front splitter. You can also see the interspersed random colours throughout the chassis.

The driver is on par with the others in the series, featuring a cheeky face and bright red helmet. His racing outfit is covered in the many sponsors and printed to a high enough quality to make the sponsor logos clear at small scale.

Conclusion and Final Recommendation
The part to price ratio on these sets are generally great and this is slightly lighter on parts at 163 pieces but tat is fine. For $19 AUD, £13 GBP or $15 USD, it is really hard to fault this set.
So in case you hadn’t guessed, I enjoyed this set, a lot and cannot recommend it enough! It, above all, surprised me in ways that I hadn’t expected and it’s gonna look great my LEGO City with the other cars.
In retrospect, writing this review, there is so much you miss during the build. It’s only when you step back and look at it again that you truly get to experience the effort the the LEGO design team have put into these products.

Video Review
And here’s my video review on the YouTube channel. Enjoy.


Leave a comment about this post